


Ever found yourself staring at a brick wall, wondering how on earth you’re going to mount that heavy shelf, bracket, or piece of equipment securely? Have you tried other anchors only to watch them spin uselessly or pull straight out of the masonry? If you’re nodding along, you’re definitely not alone—and the good news is there’s a reliable fix that doesn’t require professional help.
Hex sleeve anchors are the unsung heroes of masonry fixings. Whether you’re tackling a weekend DIY project at home or handling a commercial installation, these clever little fasteners deliver the kind of holding power that makes you wonder why you ever bothered with anything else. They’re designed specifically to grip into concrete, brick, and block, creating a rock-solid foundation for whatever you need to mount.
In this guide, we’ll walk you through everything you need to know about installing hex sleeve anchors masonary sydney. You’ll learn how they work, when to use them, how to pick the right size, and most importantly, how to install them step by step. Plus, we’ll cover common mistakes to avoid and troubleshooting tips for when things don’t go quite to plan. By the end, you’ll have the confidence to tackle any masonry anchoring project like a seasoned pro.
What Are Hex Sleeve Anchors and How Do They Work?
Understanding the Anatomy of a Hex Sleeve Anchor
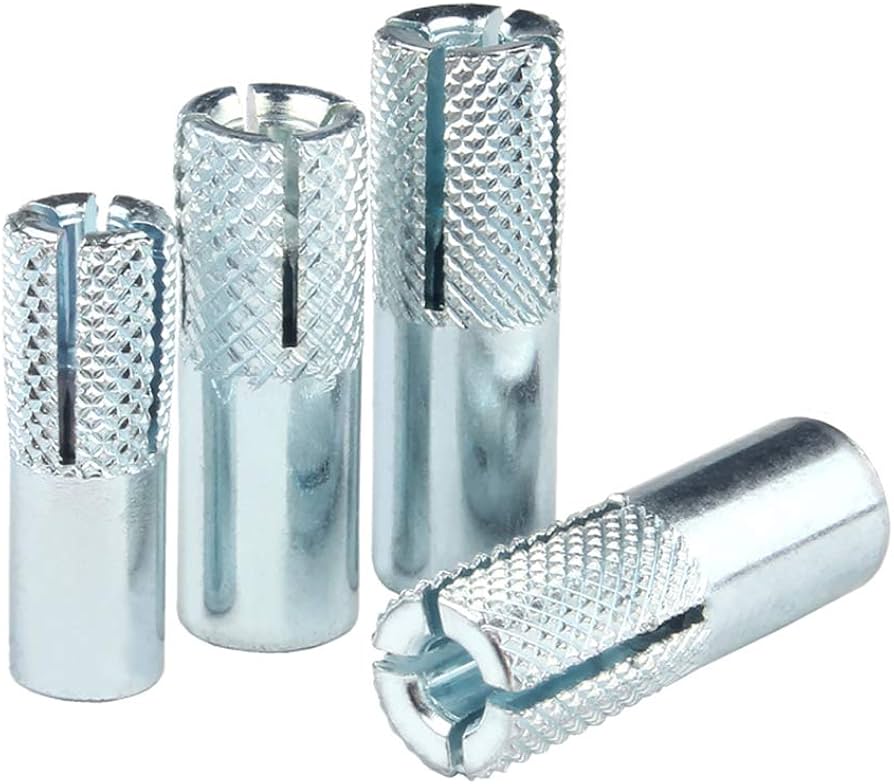
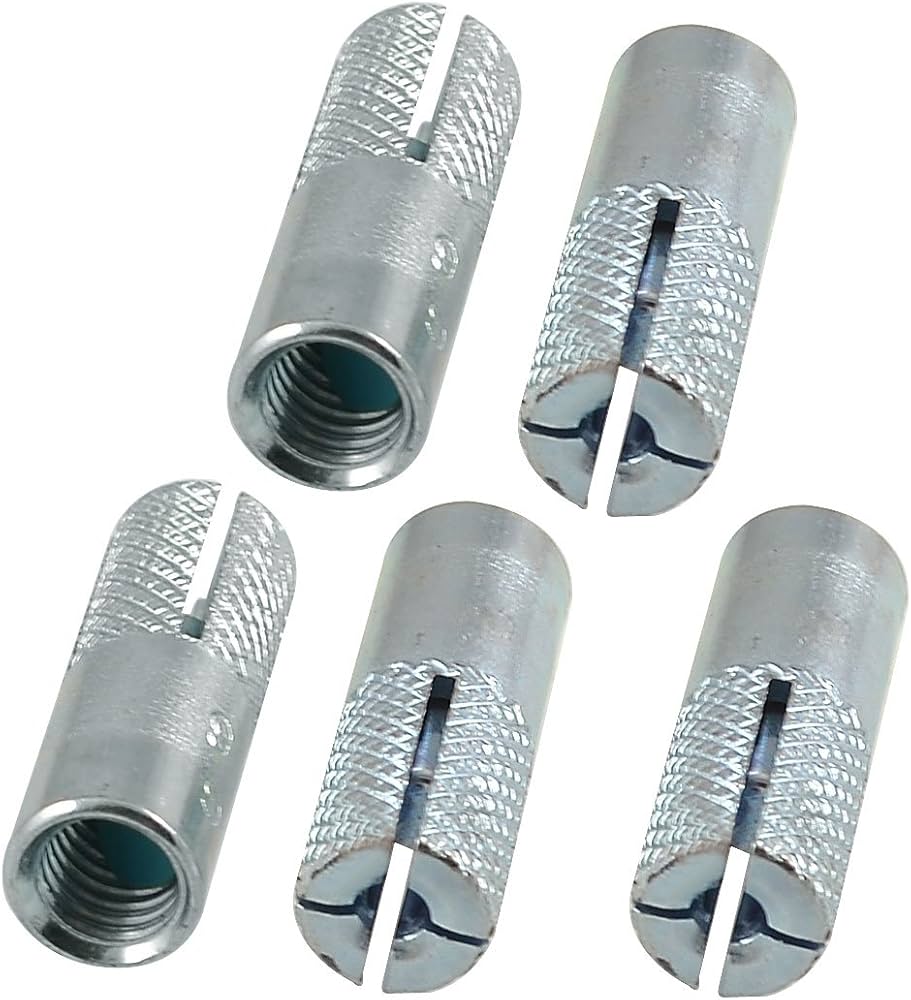
A hex sleeve anchor consists of four main components working together: a threaded bolt with a hexagonal head, an expansion sleeve, a nut, and a washer. The bolt runs through the centre, while the sleeve surrounds the lower portion. When you look at one, you’ll notice the sleeve has splits or cuts along its length—these are crucial to how it functions.
The hex head design is particularly handy because it allows you to tighten the anchor using a standard spanner or socket. This gives you much better control compared to other anchor types. The washer distributes the load across a wider surface area, preventing damage to whatever you’re mounting.
How Does the Expansion Mechanism Create a Secure Hold?
Here’s where the magic happens. When you tighten the nut, the bolt pulls upward through the sleeve. As it does, a cone-shaped section at the bolt’s end forces the sleeve to expand outward against the walls of the drilled hole. This creates tremendous friction and mechanical grip within the masonry.
The beauty of this system is that the harder you tighten (within limits), the stronger the hold becomes. The expanded sleeve essentially wedges itself into the concrete or brick, making it incredibly difficult to pull out. It’s simple physics, but remarkably effective.
When Should You Use Hex Sleeve Anchors?
Best Applications for Hex Sleeve Anchors
These anchors shine in medium to heavy-duty applications. Think mounting steel brackets, securing handrails, attaching shelving units, or fixing machinery bases. In residential settings, they’re brilliant for pergola posts, carport frames, and outdoor furniture anchoring. Commercially, you’ll find them holding up cable trays, safety equipment, and structural supports.
They’re particularly useful when you need a flush or near-flush finish, as the hex head sits neatly against the mounting surface. For Australian conditions, where outdoor fixtures face harsh sun and occasional moisture, these anchors provide reliable long-term performance.
What Materials Can Hex Sleeve Anchors Be Used In?
Hex sleeve anchors work best in solid masonry materials—concrete is their natural home. They also perform well in brick, though you’ll want to ensure you’re drilling into the brick itself rather than the mortar joints. Hollow blocks can be trickier; for these, you might need toggle-style anchors instead.
The material’s condition matters too. Freshly poured concrete should cure for at least 28 days before anchoring. Crumbling or heavily weathered masonry won’t provide adequate grip, so assess your surface before starting.
Choosing the Right Hex Sleeve Anchor Size and Type
How Do You Determine the Correct Anchor Size?
Matching your anchor to the job is absolutely key. Start by considering the hole diameter in whatever you’re mounting—your anchor must pass through it. Next, factor in the thickness of the material being fixed, then add the required embedment depth (typically a minimum of 25mm into the masonry).
Common sizes range from 6mm to 16mm diameter, with lengths from 40mm to 150mm. When in doubt, go slightly longer rather than shorter—you can always leave extra thread exposed, but you can’t magic more length if you’ve cut it short.
Load Capacity Considerations
Every anchor has a rated load capacity, usually specified for both tension (pulling out) and shear (sideways force). Always check these figures against what you’re actually mounting. For safety, apply a factor of at least four—meaning if your fixture weighs 100kg, choose anchors rated for 400kg combined.
Stainless Steel vs Zinc Plated
Zinc-plated anchors suit most indoor applications and sheltered outdoor spots. They’re more affordable and perfectly adequate for dry conditions. However, for coastal areas, wet environments, or anywhere corrosion is a concern, stainless steel is worth the extra investment. In Australia’s varied climate, this decision can make the difference between decades of service and premature failure.
Tools and Materials You’ll Need
Before starting, gather these essentials:
– Hammer drill with masonry bits (matching your anchor diameter)
– Tape measure and pencil
– Spirit level
– Safety glasses and dust mask
– Hearing protection
– Spanner or socket set
– Wire brush or compressed air
– Vacuum cleaner (optional but helpful)
Having everything ready makes the job smoother and safer.
Step-by-Step Guide: How to Install Hex Sleeve Anchors
Step One: Marking and Preparing Your Drilling Points
Position your bracket or fixture against the wall and mark your hole locations precisely. Use a spirit level to check alignment—there’s nothing worse than discovering your mounting is crooked after everything’s bolted down. Double-check measurements before picking up the drill.
Step Two: Drilling the Correct Hole Depth and Diameter
Select a masonry bit matching your anchor’s diameter exactly. Wrap tape around the bit to mark your required depth—this should be the anchor’s embedment length plus about 10mm for dust clearance. Drill straight and steady, letting the hammer action do the work without excessive pressure.
Step Three: Cleaning the Hole
This step is often rushed, but it’s crucial. Dust and debris left in the hole prevent proper expansion and dramatically reduce holding strength. Use a wire brush with an in-and-out motion, then blow out remaining dust. Repeat this process two or three times until the hole is genuinely clean.
Step Four: Inserting the Hex Sleeve Anchor
Thread the nut onto the bolt until it’s flush with the end—this protects the threads during insertion. Push the anchor into the hole by hand as far as possible, then tap it home with a hammer until the washer sits against your fixture. The anchor should feel snug but not jammed.
Step Five: Tightening and Setting the Anchor
Using your spanner, turn the nut clockwise. You’ll feel resistance increase as the sleeve expands. Tighten firmly until the fixture feels solid and immovable—typically three to five full turns past finger-tight. Don’t go overboard; once it’s secure, stop.
Common Mistakes to Avoid
Can You Over-Tighten a Hex Sleeve Anchor?
Absolutely, and it’s a common error. Over-tightening can crack the surrounding masonry, strip the threads, or cause the sleeve to over-expand and lose grip. When you feel solid resistance and the fixture doesn’t move, that’s your cue to stop.
What Happens If the Hole Is Too Deep or Too Shallow?
A hole that’s too shallow means your anchor won’t seat properly—it’ll stick out and won’t expand correctly. Too deep, and the anchor may pull through without gripping. Precision matters here, so take your time measuring and marking your drill bit.
How Strong Are Hex Sleeve Anchors in Concrete and Brick?
In quality concrete, a 10mm hex sleeve anchor typically handles around 8-10kN in tension and 15-20kN in shear. Brick generally offers slightly lower values due to its composition. Always consult manufacturer specifications for exact figures, and remember that real-world conditions can affect performance.
Can Hex Sleeve Anchors Be Removed and Reused?
Technically, you can remove them by unscrewing the bolt. However, reuse isn’t recommended—the expansion sleeve won’t contract fully, meaning it won’t grip properly in a new hole. Treat them as single-use fasteners for reliable results.
Troubleshooting: What to Do If Your Anchor Spins
A spinning anchor usually indicates the sleeve isn’t expanding against solid material. This might mean you’ve hit a void, the hole is too wide, or the masonry is deteriorating. Remove the anchor, fill the hole with anchoring compound, let it cure, then re-drill and try again.
Safety Tips for Working with Masonry Anchors
Always wear safety glasses—masonry dust and chips can cause serious eye injuries. Hearing protection matters when using hammer drills for extended periods. Work in ventilated areas or use a dust mask, as concrete dust isn’t something you want in your lungs.
Achieving Professional Results with Hex Sleeve Anchors
Installing hex sleeve anchors isn’t complicated, but it does require attention to detail. From selecting the right size and finish to drilling accurate holes and tightening correctly, each step contributes to a secure, lasting fixture. Rush the process, and you’ll likely end up with wobbling mounts and frustration.
The key takeaways are straightforward: match your anchor to your load requirements, drill precisely, clean thoroughly, and tighten appropriately without going overboard. Follow these principles, and your fixtures will stay put for years, whether you’re mounting a modest shelf or securing heavy industrial equipment.
So next time you’re facing a masonry anchoring project, approach it with confidence. You’ve now got the knowledge to achieve genuinely professional results. Grab your drill, gather your materials, and get stuck into creating fixtures that’ll stand the test of time. Your future self—the one not re-doing dodgy anchor jobs—will thank you.


